Quick answer: which route fits your file
- You already have the PDF (a downloaded form, a scan, a photo, a Word export): add the fields to it. Browser tool, Method 1 or Acrobat, Method 2. If your goal is to convert an existing form, the PDF to fillable form converter is the shorter path.
- You are designing the form from scratch: lay it out in Word or Google Docs, then add the fields in a PDF tool (Methods 3 and 5), or build it in LibreOffice Writer, which exports real fields.
- You are on a Mac or a phone: Preview cannot create fields, so use a browser tool or LibreOffice (Method 4).
- You only need to fill a form yourself: skip fields entirely and use the online PDF filler.
What a fillable PDF actually is
A fillable PDF is an ordinary PDF with an extra layer the PDF standard calls an AcroForm. Each field in that layer has a name, a type and a rectangle. Any viewer that understands AcroForm, which includes Acrobat Reader, Chrome, Edge, Firefox, Preview and most phone PDF apps, draws an input at that rectangle and lets the reader type. The page underneath never changes.
That is why the question has one answer regardless of tool: something has to write those fields into the file. A PDF exported from Word or Google Docs has none. A scan has none. A PDF that was flattened had them and lost them. If you are not sure which kind you are holding, the PDF form field inspector lists every field a file contains. If you only need to fill a form yourself rather than send a fillable one to others, use the online PDF filler instead; it does not require fields at all.
Six methods
Pick the method that matches your file and your device
Each method below lists the steps, how long it takes, what it costs and what it cannot do. Methods 3, 4 and 5 exist mainly to save you a detour: people search for them, and the honest answer is that they route back to Method 1 or 2.
Method 1
In the browser with JustFill (free to start)
The fastest route when the PDF already exists: a form downloaded from a website, a Word export, a scan. You add the fields in the browser and export a standard AcroForm. The same tool powers the make PDF fillable page, which is where to go when you want to skip the reading and start.
- Time
- About 5 minutes for a one-page form.
- Cost
- Building and previewing fields is free. Interactive AcroForm export is included in a monthly plan (Starter is $19/month with 125 clean output pages a month). Your first clean flattened filled PDF is free, and a $7 one-time pack adds 25 clean PDFs and 25 AI credits with no expiry for flattened downloads.
- What it cannot do
- It does not rewrite the printed text of the page, does not add JavaScript calculations or submit buttons, and signature fields are not exported as interactive widgets.
- 1
Upload the PDF. Open the fillable PDF tool and drop in the file. Flat PDFs, Word (.docx) files, scans and phone photos (JPG or PNG) are accepted; a Word file or a photo is converted to a PDF automatically and nothing has to be OCR-processed first.
- 2
Detect or draw the fields. Field detection places a field on each input line, checkbox, text area and table cell it finds on the page image. If something is missing, use the Draw tool to drag a rectangle where the answer goes. Every field can be moved and resized.
- 3
Name and type each field. Give each field a descriptive name such as employee_name; it becomes the AcroForm field name a recipient’s viewer shows. Mark checkboxes, radio groups, dropdowns and multiline areas so they export as the right widget type.
- 4
Export as a fillable PDF. Choose Download as fillable PDF. The result is a standard AcroForm that opens with clickable fields in Acrobat Reader, Chrome, Edge, Preview and phone PDF apps. If you filled the form yourself and want the answers locked in, download the flattened version instead.
- 5
Save the layout as a template. Save the reviewed field layout. The next copy of the same form is recognized on upload and the fields are already in place.
Method 2
Adobe Acrobat Pro (or Standard)
Acrobat is the reference implementation of the format. If you already pay for it, its form tool is thorough and its output is what every other viewer is tested against. The catch is the product line: Adobe’s help states that Prepare Form is “only available when you are subscribed to Acrobat Pro or Acrobat Standard (Continuous track)”. The free Acrobat Reader can fill and sign a form but cannot create fields. Adobe: restore missing tools
- Time
- 5 to 15 minutes, depending on how much auto-detection gets right.
- Cost
- Paid subscription to Acrobat Pro or Acrobat Standard. Acrobat Reader is free but cannot create fields.
- What it cannot do
- Reader’s Fill & Sign adds text on top of a flat form for you; it does not give the next person a field. The steps below are for the Acrobat desktop app.
- 1
Open Acrobat and choose All tools › Prepare a form.
- 2
Select the PDF, or scan a paper document, and click Create form. Acrobat runs field detection and places text fields, checkboxes, radio buttons and signature fields where it recognizes them. Adobe: convert documents to PDF forms
- 3
Review the result in form editing mode. Delete false positives, resize fields that hug the wrong line, and add missing ones from the form panel on the right.
- 4
Check each field’s name and whether it should be required before you finish.
- 5
Save the PDF. Recipients need only the free Reader to fill it.
Method 3
Microsoft Word to a fillable PDF
Word can make a document fillable inside Word: the Developer tab has Rich Text, Check Box and Drop-Down List content controls. Microsoft: create a form in Word . Those controls stop at the PDF boundary. File › Save As › PDF and File › Export both write a flat page, and the controls come out as printed placeholder text such as “Click here to enter text”, not as AcroForm fields. Microsoft’s answer to that exact complaint: “There is no option in Word to create a PDF form.” Microsoft Q&A
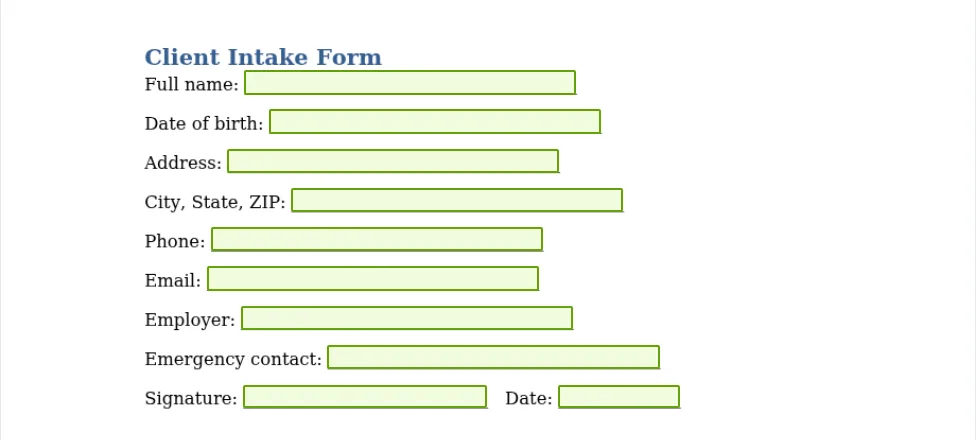
Use Word for what it is good at, the layout. Type the labels, draw the lines and boxes with generous spacing, then add the fields with Method 1 or Method 2. With Method 1 you can upload the .docx directly and it is converted to a PDF for you. The blanks you drew are exactly what field detection looks for. The convert PDF to fillable form page walks through that hand-off, and make a fillable PDF from Word covers the Word file itself.
- 1
Lay the form out in Word: labels on the left, a blank line, table cell or box for each answer, with room to type. Leave out the Developer tab controls; they will not survive the PDF export.
- 2
Save the .docx. You can upload it to JustFill as it is, or use File › Save As › PDF and upload the PDF.
- 3
Run field detection, then move, resize or add any field it missed with the Draw tool.
- 4
Export the fillable PDF and open it in a viewer to click into every field before you send it.
The free desktop route: LibreOffice Writer
Unlike Word, LibreOffice exports its form controls as real PDF fields. Its PDF export dialog has a Create PDF form option that, in the words of the help page, creates a form that “can be filled out and printed by the user of the PDF document”. LibreOffice: PDF export options
- Time
- 15 to 30 minutes for a typical form; Word layout plus Method 1 is usually faster.
- Cost
- Free. LibreOffice runs on Windows, macOS and Linux.
- What it cannot do
- Writer places controls in the document flow, so lining them up over an existing scanned page takes extra work: insert the scan as an image anchored to the page and lay controls over it.
- 1
Open the document in LibreOffice Writer. It opens .docx files, or you can rebuild the layout from scratch.
- 2
Choose View › Toolbars › Form Controls. The toolbar offers Text Box, Check Box, Option Button, List Box, Combo Box and Date Field among others. LibreOffice: Form Controls
- 3
Draw a control where each answer goes and give it a name in its properties. Keep names unique.
- 4
Choose File › Export As › Export as PDF. On the General tab tick Create PDF form, then export.
- 5
Open the exported file in a PDF viewer and click into every field before you send it.
Method 4
On a Mac
Preview fills, it does not build. Apple’s guide covers two things: “Click a field in the form, then type your text” when fields exist, and “If a PDF won’t allow you to type directly into the form, you can add a text box instead” when they do not. That text box is an annotation for you; it does not give the next person a field, and Preview has no tool for creating one. Apple: fill out PDF forms in Preview
- Time
- About 5 minutes in the browser.
- Cost
- Free to start in the browser; LibreOffice is free; Acrobat Pro for Mac is a paid subscription.
- What it cannot do
- Preview cannot create fields, so every Mac route ends up in a browser tool, LibreOffice or Acrobat.
- 1
Open JustFill in Safari or Chrome and upload the PDF, or drop it on the make PDF fillable page. Nothing is installed.
- 2
Let detection place the fields, then draw or adjust any it missed with the trackpad.
- 3
Export the fillable PDF. Open it in Preview afterwards: the fields are now there to click into.
- 4
Prefer desktop software? Install LibreOffice and follow the Writer steps in Method 3. Already paying for Acrobat Pro? Method 2 works the same on macOS.
Method 5
Google Docs or Google Drive
Google Docs has no form-field tool. File › Download › PDF produces a flat PDF; blanks and underscores you typed are just characters. Google Forms is a web survey, not a PDF, and Drive’s preview can only display a PDF. Design the document in Docs if that is where it lives, download it as a PDF, and add the fields with Method 1. It takes a couple of minutes and the fillable file can go back into Drive.
- Time
- 2 minutes to download, then about 5 minutes in Method 1.
- Cost
- Free for the Docs part; Method 1 pricing applies to the export.
- What it cannot do
- Docs, Sheets, Slides and Drive cannot write AcroForm fields, and a Google Form cannot be turned into a fillable PDF.
- 1
Build the layout in Google Docs: a label, then a blank line or a table cell for each answer.
- 2
Choose File › Download › PDF document (.pdf). The result is a flat PDF.
- 3
Upload that PDF to a form tool (Method 1) and let detection place the fields, or draw them yourself.
- 4
Export the fillable PDF and, if you want it in Drive, upload the new file there.
Method 6
From a scanned paper form or a photo
A scan is a picture. It has no fields and usually no text layer, which is why Preview and Chrome show nothing to click. That is not an obstacle to adding fields: a form field is a rectangle at a coordinate on the page, so it sits on top of an image just as well as on top of typed text. OCR is not required. JustFill’s detector works on the page image directly, and it accepts JPG and PNG photos, so a paper form photographed with a phone is a valid starting point. The same approach is what makes the free Adobe Fill & Sign alternative work on paper forms.
- Time
- About 5 minutes once the scan is clean.
- Cost
- Same as Method 1. Acrobat’s Prepare a form also accepts scanned documents if you have a subscription.
- What it cannot do
- A skewed or blurry photo gives crooked fields. Re-shoot the page flat and straight rather than nudging every rectangle.
- 1
Scan or photograph the form on a flat surface in even light, straight on. A 300 dpi scan or a modern phone photo both work.
- 2
Upload the file as-is: PDF, JPG or PNG. A photo becomes a single PDF page automatically.
- 3
Run detection. It finds the printed lines, boxes and checkboxes on the image; adjust anything it missed with the Draw tool.
- 4
Export the fillable PDF. Recipients see the original scan with clickable fields on top, and you can save the layout as a template for the next copy.
Which method?
Which method should you use?
If the PDF already exists and you want fields today, use the browser. If you own Acrobat, use Acrobat. If you want free desktop software and are building the form from scratch, use LibreOffice. Word, Preview and Google Docs are layout or viewing tools in this story, not form builders.
| Tool | Cost | Creates real AcroForm fields | Works on scans | Needs install |
|---|---|---|---|---|
| JustFill (browser) | Free to build and preview; interactive AcroForm export on Starter ($19/mo) | Yes, automatic AI field detection | Yes, including phone photos | No |
| Adobe Acrobat Pro or Standard | Paid desktop subscription | Yes (manual review required on scans) | Yes | Yes, desktop app |
| Microsoft Word | Microsoft 365 or Office license | No, controls are lost on PDF export | No | Yes |
| Apple Preview | Included with macOS | No, fills existing fields only | No | No, built in |
| Google Docs | Free | No, downloads a flat PDF | No | No |
Step-by-step for the app you use
- In Adobe AcrobatPrepare a form, font size, tab order, prices
- On a MacWhat Preview can and cannot do
- From Google DocsDocs downloads a flat PDF
- From a Canva designWorkbooks, planners, worksheets
- From a Word documentUpload the .docx directly
- A fillable form in Word itselfDeveloper tab, and why PDF export loses it
- Add a checkbox or text fieldField types and font size
What JustFill costs
What you pay for in JustFill, and when
| Step | Price |
|---|---|
| Build and preview the fields | Free. No card to start. |
| First clean download | Free. It is a flattened filled PDF, so its answers are no longer editable as fields. Later downloads carry a watermark until you upgrade. |
| Interactive fillable PDF export | Included in Starter ($19/month) and Pro ($49/month), along with reusable templates and batch workflows (a $7 pack for 25 clean downloads is also available for flattened fills). |
| Monthly plans | $19 Starter, $49 Pro, $99 Business per month. Cancel any time from the billing page. |
| Yearly plans | $190 Starter, $490 Pro, $990 Business per year. |
Full details and the current limits are on the pricing page. Acrobat Pro and Standard are paid subscriptions priced by Adobe; check Adobe’s page for the current figure.
Before you send
Checklist before you send a fillable PDF
Field names are unique and descriptive. Two fields with the same name are one field in every viewer: type into one and the other fills too. Use names like
date_of_birth, notText1.Tab order follows reading order. Press Tab through the whole form once; a cursor that jumps from the header to the footer is the most common complaint from recipients.
Required fields are marked and checkbox groups have sensible on and off values, so the data you get back is usable.
Test in Acrobat Reader, Chrome and on a phone. Those three cover most of the rendering differences you will ever hear about.
Flatten a completed copy when the answers are final. The PDF flattener bakes the values into the page so they cannot be changed and print identically everywhere.
Inspect the fields one last time. The form field inspector lists every field, its type and its name, which is the quickest way to spot a duplicate or a leftover test field.
Check whether the blank already exists. For common government and tax forms, the form library has the official PDF ready to fill, so you may not need to build fields at all.
Frequently asked questions
Make your PDF fillable now
Upload a flat PDF, a scan or a photo. Fields are detected in seconds, the preview is free, and the exported file opens with clickable fields in any viewer.
Upload your form
Choose a PDF, a Word file or an image from your files, or photograph a paper form.
PDF, Word (.docx), JPG, PNG, WebP, HEIC, GIF and BMP. Free account required, no credit card.
Your first download is free, with no watermark. After that: a watermark, or a $7 one-time pack (5 clean PDF downloads + 25 AI credits). AI detection covers up to 15 pages per run.
By uploading, you confirm you have the legal right to use this document.
Prefer the tool page? Go to Make PDF Fillable
Choosing a tool? See the fillable PDF creators compared.
Doing this for clients? See JustFill for freelancers and agencies.